Building Flash applications with Google App Engine
Update: This post is barely a week old and already outdates. See my updated post and The GAE SWF Project to get started quickly buildingFlash and Flex applications on Google App Engine. I've been playing with Google App Engine since last night and I love it. Here, I present to you a simple proof of concept I built that shows you how to build Flash and Flex applications with Google App Engine and PyAMF. (The sample uses Flash and AS3 but you can use same technique in Flex. I'm going to release a Flex-based sample next.)
The example uses the Users API to log users in to your Flash application. The same Google App Engine application is used to host your PyAMF gateway, the Python application, and your static files (SWF, JavaScript, etc.) It also uses the Django templating engine built into the Google App Engine webapp framework.
To start, download the Google App Engine SDK and follow the instructions on the Getting Started Guide to make sure that it is installed correctly.
Next, download my Google App Engine Flash sample (gaepyamf.zip; 705KB. MD5: bf9b9364e0e6e78274b09d8d30886f76) and unzip it.
(I'm releasing this sample under the open source MIT License so feel free to use it as a base on which to build your own Flash and Flex applications with Google App Engine and PyAMF. I've tried to use good practices in the sample whenever possible but keep in mind that it's something I whipped up in a couple of hours so it's being released as-is with no warranties of any kind. If you find any issues or if you have suggestions, please let me know in the comments.)
Once you've unzipped the sample, open up the command line (on Macs, Terminal) and type the equivalent of the following for your operating system:
cd /folder/you/just/unzipped
dev_appserver.py .
This will start the Google App Engine Development Server. You should see output that resembles:
INFO     2008-04-11 12:13:54,424 appcfg.py] Checking for updates to the SDK.
INFO     2008-04-11 12:13:54,958 appcfg.py] The SDK is up to date.
INFO     2008-04-11 12:13:55,016 dev_appserver_main.py] Running application new-project-template on port 8080: http://localhost:8080
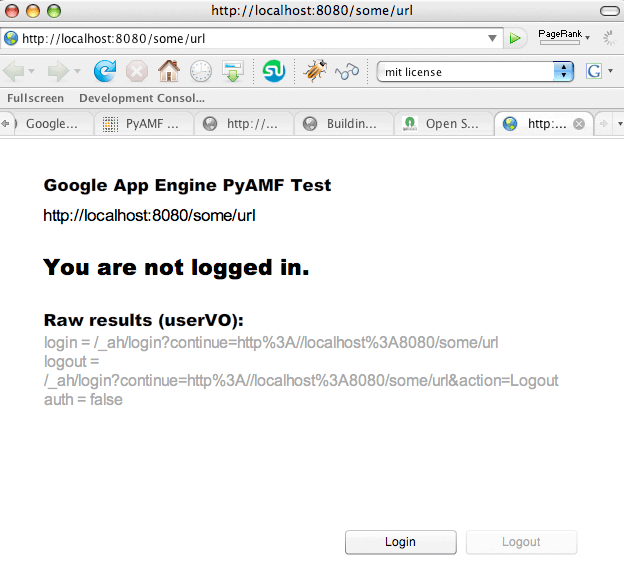
Open a browser to http://localhost:8080 and you should see the sample Flash application. In the screenshot, below, I used the address http://localhost:8080/some/url to demonstrate the deep linking feature.

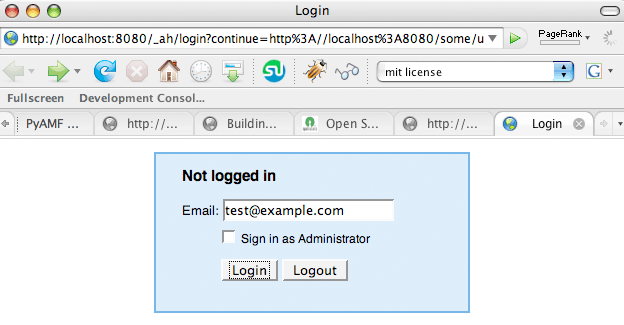
Next, click the Login button and you will be taken to the login screen. When you deploy the app, this will take you to the Google Accounts login screen.

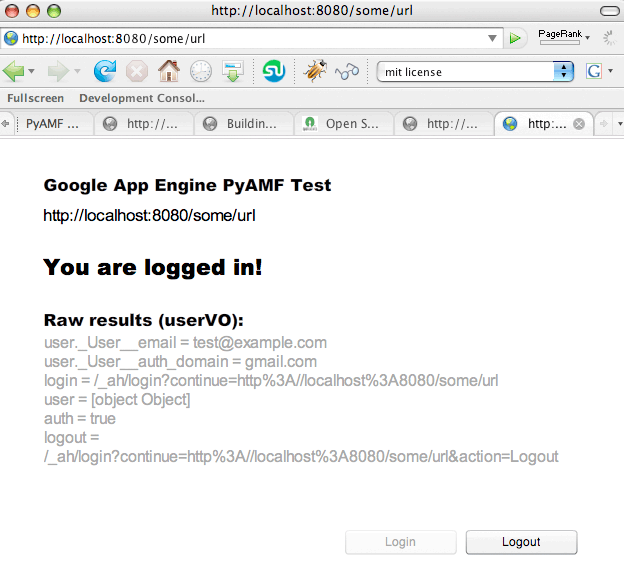
Once you've logged in, you will be returned to the application. This time, the application knows that you're logged in.

(Unfortunately, I can't actually show you the application running as I'm not on the Google App Engine beta yet and can't deploy applications. The first 10,000 spots apparently went on the day that it was released while I was at the onAIR event in London so I'm currently on the waiting list.)
Update: Javier stated in the comments that he has uploaded the application using his account: see the GaePyAMF application online on appspot.
Now this is not the ideal login scenario for state-maintaining Flash and Flex applications but it does showcase everything that is involved in getting it up and running.
There are three possible ways that you can handle login of users in your own applications.
- The first method is the one shown above. The disadvantage of this method is that you are loading your Flash or Flex application and then taking the user to an HTML page and then reloading your application. This is quite jarring and not the sort of experience users are used to with Flash and Flex-based applications.
- A second method is to check whether the user is logged in before loading your Flash application. This way, you can immediately send them to log in to your application and then load the Flash application with the user already-logged in. The downside of this approach is that you will essentially be requiring logins before letting the user in.
- A final approach is to load the Flash application but, instead of opening the Google Accounts login page in the same tab/window, make it open in a separate tab/window. Once the user logs in, make that tab/window forward to an HTML page with a "Thank you, you are now logged in. Please close this tab/window to continue." message and have the Flash application periodically poll to see if the user is logged in. Either this method or method #2 should provide the least jarring experience for your users.
So how does it all work?
Start by looking at the app.yaml file. This file describes your Google App Engine application and acts as the Front Controller.
application: gaepyamf
version: 1
runtime: python
api_version: 1

handlers:

# PyAMF Flash Remoting Gateway
- url: /gateway
  script: gateway.py

# Static: SWF files
- url: /swfs
  static_dir: swfs

# Static: Template files
- url: /templates
  static_dir: templates

# Static: JS files
- url: /js
  static_dir: js

# For all other URLs, use the main dispatcher
- url: .*
  script: main.py
The first few lines define the application's name, version (when you deploy apps, Google automatically versions them and allows you to rollback to previous versions), the runtime uses (currently only Python is supported by Google has stated that other languages will be added in the future), and the API version (currently, 1).
The handlers section is the most important bit. They define the Front Controller for your application, mapping URLs to handle both scripts and static files.
This is where you define the PyAMF gateway using:
- url: /gateway
  script: gateway.py
This means when you access http://localhost:8080/gateway, that request will be routed to the PyAMF gateway.
A version of PyAMF 0.2, patched to run on Google App Engine, is included in the sample application in the pyamf/ folder.
Similarly, you want to be able to serve the rest of your application (the HTML file that contains your SWF, for example) from the same Google App Engine application instance, so you define additional handlers. The ones defined here include static handlers for SWF and JavaScript files (which each get their own folder; you can as easily map them by MIME-type) and a folder to hold your templates.
Take a look at the gateway.py file:
import wsgiref.handlers
from pyamf.remoting.gateway.wsgi import WSGIGateway

# You can also use a wildcard import services here.
from services import EchoService
from services import user

# Service mappings
s = {
  'EchoService': EchoService.EchoService,
  'user': user
}

def main():
  application = WSGIGateway(s)
  wsgiref.handlers.CGIHandler().run(application)

if __name__ == '__main__':
  main()
It's a pretty standard PyAMF gateway. I've placed all services in the services package. The user service is the one that you're using. Take a look at that:
from google.appengine.api import users

from pyamf.remoting.gateway import expose_request

from wsgiref.util import request_uri

@expose_request
def login(request, access_url):
  user = users.get_current_user()

  # The user value object (VO) contains login and logout URLs.
  # (With /gateway stripped out so that it returns to the SWF).

  # uri = request_uri(request)
  userVO = {
    'login': users.create_login_url(access_url),  #.replace('/gateway', ''),
    'logout': users.create_logout_url(access_url), #.replace('/gateway', ''),
    'auth': False
  }

  if user:
    # Add the user object to the user VO.
    userVO['user'] = user
    userVO['auth'] = True
    return userVO
  else:
    return userVO
When the login() method of the user service is called, you create a user value object that contains the login and logout urls, along with a boolean value to signify whether the user is authorized. If the user is authorized, you also add the user object to the userVO and return it to the Flash client.
On the Flash side of things, the code looks like this:
import flash.net.*;

var loginURL:String;
var logoutURL:String;

var accessURL:String = root.loaderInfo.parameters.url;

if (accessURL == null) accessURL = root.loaderInfo.url;

var netConnection:NetConnection = new NetConnection();
netConnection.connect("http://localhost:8080/gateway");
var responder:Responder = new Responder(onComplete, onFail);
netConnection.call("user.login", responder, accessURL);

loginButton.addEventListener(MouseEvent.CLICK, loginButtonClickHandler);
logoutButton.addEventListener(MouseEvent.CLICK, logoutButtonClickHandler);

accessURLTF.text = accessURL;

function onComplete(results){

    var userVO:Object = results;

    // Display auth status
    if (userVO.auth)
    {
      // User is logged in
      authStatusTF.text = "You are logged in!";
      loginButton.enabled = false;

      // Log user details
      for (var userItem in userVO.user)
      {
        outputTF.appendText(userItem + " = " + userVO.user[userItem] + "\n");
      }

    }
    else
    {
      authStatusTF.text = "You are not logged in.";
      logoutButton.enabled = false;
    }

    // Log the returned results
    for (var item in userVO)
    {
      outputTF.appendText(item + " = "  + userVO[item] + "\n");
    }

    loginURL = userVO.login;
    logoutURL = userVO.logout;

}

function onFail(results){
        for each (var thisResult in results){
                outputTF.appendText(thisResult);
        }
}

function loginButtonClickHandler(event:MouseEvent)
{
  getURL(loginURL);
}

function logoutButtonClickHandler(event:MouseEvent)
{
  getURL(logoutURL);
}

function getURL(url:String):void
{
  var request:URLRequest = new URLRequest(url);

  try
  {
    navigateToURL(request, '_self');
  }
  catch (e:Error)
  {
    trace("Error occurred!");
  }
}
Basically, you call the login() method via Flash Remoting and, based on whether the user is authorized or not, enabling either the Login button or the Logout button.
Note that you are also sending an argument called accessURL. This is the URL of the SWF that is making the request (either the one passed to it via FlashVars or, to make sure it works when testing in the IDE, the one reported by the SWF.) This is important because this is the URL that the webapp framework uses to create the correct forwarding URLs via the users.create_login_url() and users.create_logout_url() methods.
(I initially tried to use the expose_request decorator in PyAMF to pass the request object to the login() method and use request_uri() to get the URL from it but, of course, that returns the URL for the gateway, not your SWF. I've kept the code commented out in the example above just to show you how to use that useful decorator.)
So that's how the login call works, but how is the SWF displayed?
Look at the end of the app.yaml listing again:
# For all other URLs, use the main dispatcher
- url: .*
  script: main.py
All requests that don't match the ones above are routed to main.py:
import wsgiref.handlers
from google.appengine.ext import webapp

from google.appengine.ext.webapp import template

class MainHandler(webapp.RequestHandler):

  def get(self):
  template_values = {
    'url': self.request.uri
  }
  self.response.out.write(template.render("templates/main.html", template_values))

def main():
  application = webapp.WSGIApplication([('/.*', MainHandler)],
                                       debug=True)
  wsgiref.handlers.CGIHandler().run(application)

if __name__ == '__main__':
  main()
The MainHandler in main.py uses the Django template engine that's built into the webapp framework to render the main HTML file. It also passes the current URL to the Flash application via the url template parameter to aid in the implementation of deep linking.
Finally, here's the template I used:
<head>
<meta http-equiv="Content-Type" content="text/html; charset=utf-8" />

<title>{{url}}</title>
<script src="/js/swfobject.js" language="javascript"></script>
</head>

<body scroll="no">
  <div id="mainswf">Google App Engine PyAMF Example by Aral Balkan</div>

  <script language="JavaScript" type="text/javascript">
    /*<!--*/
    var so = new SWFObject("/swfs/main.swf", "MainSWF", "100%", "100%", "9");
    so.addVariable("url", "{{url}}");
    so.write("mainswf");
    /*-->*/
  </script>
</body>
The template uses SWFObject to embed the SWF and passes the url parameter to the SWF. The URLs for the static objects (SWF, JS, etc.) are mapped in the app.yaml file.
I hope this helps you get started with building Flash and Flex applications for Google App Server.
I'm going to try and talk to someone at Google in the next few days as I'm seriously considering using Google App Server for Singularity. I just need to make sure that we won't be hit by the quotas that they have in place.

Comments
by Javier on 2008-04-11 20:20:38
by pablo on 2008-04-11 18:55:42
by Aral on 2008-04-14 20:54:04
by Imrahil on 2008-04-11 13:33:02
by Javier on 2008-04-11 16:49:18
by Aral on 2008-04-11 23:14:10
by shaunxcode on 2008-04-11 18:42:51
by Aral on 2008-04-11 22:52:43
class MainHandler(webapp.RequestHandler):

  def get(self):
    user = users.get_current_user()

    if user:
      template_values = {
        'url': self.request.uri
      }
      self.response.out.write(
        template.render("templates/main.html", template_values))
    else:
      self.redirect(users.create_login_url(self.request.uri))
by HG on 2008-04-14 16:35:52
by sns flash 游戏开发教程(3) | 游戏、分享与创作 on 2008-12-10 06:11:05
by Anil on 2009-01-16 06:03:16
by vhe74′Stuff » Bookmarks du 16 Juillet 2009 on 2009-07-16 08:27:35
by Mcboy on 2009-12-16 12:21:39
by vinay on 2010-02-24 10:01:58
by Gildo on 2010-06-11 17:27:46
by adoia on 2011-09-28 06:23:01
by Malinda on 2012-12-29 09:28:01